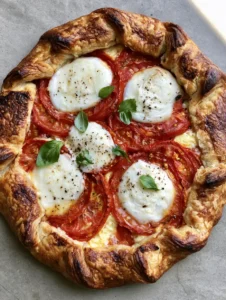
Prepare to forget everything you thought you knew about gluten-free baking. This is the ultimate gluten-free focaccia recipe, a game-changer that delivers an unbelievably light, airy, and fluffy interior crumb absolutely bursting with bubbles. We’ve unlocked the secret to that perfect chew and golden, glistening crust that you’ve been dreaming of.
Inspired by the warm, natural light of an Italian bakery, this recipe is designed to produce a focaccia that is not just good for gluten-free, but is genuinely exceptional bread, full stop. The close-up details don’t lie: a gorgeously browned crust, shimmering with high-quality extra virgin olive oil, and generously adorned with fresh rosemary and flaky sea salt. It’s a sensory masterpiece, and it’s surprisingly simple to create in your own kitchen.

Why This Focaccia Recipe Will Redefine Your Gluten-Free Baking
This isn’t just another dense, crumbly gluten-free bread. This is a recipe engineered for texture, flavor, and that signature focaccia appearance.
- Unbelievably Airy Crumb: We use a specific combination of ingredients to trap air and create those beautiful, irregular bubbles that define authentic focaccia.
- Rich, Golden Crust: A generous amount of olive oil and the right oven temperature create a crust that’s perfectly crisp on the outside while remaining tender within.
- Herbaceous & Savory Flavor: Fresh rosemary and flaky sea salt aren’t just toppings; they infuse every bite with classic, mouthwatering Italian flavor.
- Visually Stunning Results: This recipe produces a focaccia that looks just as incredible as it tastes, perfect for sharing with friends and family (or enjoying all by yourself!).
The Building Blocks for a Flawless Gluten-Free Focaccia
The magic of this recipe lies in the synergy between a few key ingredients. Each one plays a critical role in building the structure and flavor that gluten-free flour alone cannot achieve.
For the Focaccia Dough
Gluten-Free All-Purpose Flour Blend: 3 1/3 cups (400g) – The foundation of our bread. It’s crucial to use a high-quality blend that contains xanthan gum to help provide structure and elasticity.
Whole Psyllium Husks: 2 tbsp (16g) – This is our non-negotiable secret weapon. When mixed with water, psyllium forms a gel that mimics gluten, giving the dough incredible structure and trapping air for that light, bubbly texture.
Active Dry Yeast: 2 1/4 tsp (7g) – The leavening agent that breathes life into our dough. Make sure your yeast is fresh and active for the best rise.
Granulated Sugar: 1 tbsp (12g) – A touch of sugar provides food for the yeast, helping it activate and create the carbon dioxide that makes the bread rise.
Fine Sea Salt: 1 1/2 tsp (9g) – Salt is essential for flavor and also helps to control the yeast’s activity, ensuring a steady, even rise.
Warm Water: 2 cups (480ml) – The water should be lukewarm, around 110°F (43°C), to properly activate the yeast without harming it.
Extra Virgin Olive Oil: 1/4 cup (60ml), plus more for drizzling – Olive oil provides moisture, rich flavor, and is key to achieving that signature glistening, golden-brown crust.
For the Topping
Fresh Rosemary: 2 sprigs – The aromatic oils in fresh rosemary are released during baking, infusing the bread with its classic, pine-like fragrance and taste.
Flaky Sea Salt: For sprinkling – This salt provides a delightful crunch and a clean, briny finish that contrasts beautifully with the rich olive oil.

Essential Tools for Focaccia Perfection
You don’t need a professional bakery to make this bread. With a few standard kitchen tools, you’ll be well on your way to success.
- Stand Mixer: While not strictly necessary, a stand mixer with a paddle attachment makes mixing the sticky dough incredibly easy. You can also use a hand mixer or mix vigorously by hand.
- 9×13 inch (23×33 cm) Baking Pan: A metal pan is ideal as it conducts heat well, helping to create a crisp bottom crust.
- Small and Large Mixing Bowls: For activating the yeast and mixing the dough.
- Measuring Cups and Spoons: Accuracy is key in gluten-free baking.
Crafting Your Airy Gluten-Free Focaccia, Step-by-Step
Follow these phases closely to build the perfect dough structure, achieve a beautiful rise, and bake your focaccia to golden-brown perfection.
Phase 1: Activating the Foundation
In a small bowl, combine the warm water, sugar, and active dry yeast. Give it a gentle stir and let it sit for 5-10 minutes. You’re looking for a key visual cue: the mixture should become foamy and bubbly. This tells you the yeast is alive and ready to work.
Phase 2: Building the Dough
In the bowl of your stand mixer (or a large mixing bowl), whisk together the gluten-free flour blend, psyllium husks, and fine sea salt. Once the yeast mixture is foamy, pour it and the 1/4 cup (60ml) of olive oil into the dry ingredients. Mix on low speed for about a minute until a sticky, batter-like dough forms. Increase the speed to medium and beat for 3-4 minutes. This process helps incorporate air and fully hydrate the flour and psyllium.
Phase 3: The First Rise (Bulk Fermentation)
Scrape the dough into a lightly oiled bowl and cover it with a clean kitchen towel or plastic wrap. Place it in a warm, draft-free spot for about 1 hour, or until the dough has nearly doubled in size. This fermentation stage is where the initial flavor and airy structure develop.
Phase 4: Shaping and the Second Rise
Generously grease your 9×13 inch baking pan with olive oil. Gently scrape the risen dough into the pan. With oiled fingertips, spread and press the dough to fill the corners of the pan. It will be sticky, so don’t be afraid to re-oil your fingers. Cover the pan and let the dough rise again in a warm place for 30-40 minutes until it looks puffy.
Phase 5: Dimpling and Baking
Preheat your oven to 425°F (220°C). Uncover the risen dough. Drizzle it generously with more extra virgin olive oil. Now for the fun part: dimple the dough by pressing your oiled fingertips all the way down to the bottom of the pan, creating little wells all over the surface. Sprinkle evenly with fresh rosemary leaves and flaky sea salt. Bake for 20-25 minutes, or until the crust is a deep golden brown and firm to the touch. The sound you’re listening for is a hollow thump when tapped.
Expert Secrets for Focaccia Success
Keep these professional tips in your back pocket to troubleshoot and perfect your gluten-free focaccia every time.
- Don’t Under-Oil the Pan: Be generous! The oil not only prevents sticking but also essentially “fries” the bottom of the focaccia, creating an irresistibly crisp crust.
- Trust the Stickiness: Gluten-free dough is not like traditional wheat dough. It will be very sticky and more like a thick batter. Do not add more flour; this is the correct consistency for a moist, airy result.
- Find a Warm Spot for Rising: If your kitchen is cool, you can create a warm environment by placing the dough in an oven that is turned off but has the light on.
- Let It Cool Slightly: As tempting as it is, let the focaccia cool in the pan for at least 10 minutes before slicing. This allows the crumb to set properly.
Storing, Reheating, and Freezing Your Focaccia
Gluten-free bread is always best the day it’s made, but this focaccia holds up beautifully. For optimal freshness, store it in an airtight container at room temperature for up to 2 days. To reheat and bring back that fresh-baked crispness, warm slices in a 350°F (175°C) oven for 5-7 minutes. For longer storage, you can freeze the entire slab or individual slices for up to a month. Thaw at room temperature and reheat in the oven.
Perfect Pairings: What to Serve With Your Focaccia
This gluten-free focaccia is a versatile star. Enjoy it on its own, dipped in more olive oil, or use it as the perfect companion to a variety of dishes. It’s a wonderful base for sandwiches or an elegant side for a hearty meal. We love serving it alongside a comforting bowl of creamy roasted poblano soup or using it to sop up the last bits of a rich Italian ground beef pasta soup. It also pairs wonderfully with savory main courses like our popular garlic steak bites and potatoes.
Your Gluten-Free Focaccia Questions, Answered
Navigating gluten-free baking can bring up questions. Here are answers to some common queries to guide you on your journey.
Yes! This gluten-free focaccia recipe is naturally vegan as it contains no eggs or dairy. It’s a perfect plant-based option for everyone to enjoy.
Yes, but with caution. This recipe was tested with a high-quality all-purpose blend containing xanthan gum. If your blend doesn’t have xanthan gum, you may need to add it separately. Different blends have varying absorbency, so results may differ slightly.
The key is to use well-oiled fingertips and press all the way down to the bottom of the pan after the second rise. Don’t be gentle! These dimples create the classic focaccia texture and hold little pools of delicious olive oil.
The most common culprit is inactive yeast. Always check the expiration date and ensure your water is warm (about 110°F/43°C), not hot, as hot water can kill the yeast. Another reason could be that the rising environment was too cold.
Psyllium husk is a type of fiber that forms a gel when mixed with water. In gluten-free baking, it’s a crucial ingredient that mimics gluten’s structure, providing elasticity and trapping air. We do not recommend substituting it, as it’s the key to the focaccia’s light and airy texture.
The Complete Gluten-Free Focaccia Recipe
Here it is—the detailed, printable recipe card with everything you need. Pin this for later and get ready to bake the best gluten-free bread of your life.
The Ultimate Gluten-Free Focaccia: Incredibly Airy, Fluffy, and Easy
Ingredients
Equipment
Method
- In a small bowl, combine the warm water, sugar, and active dry yeast. Stir gently and let it sit for 5-10 minutes until the mixture is foamy and bubbly.
- In a stand mixer bowl, whisk together the gluten-free flour, psyllium husks, and fine sea salt. Add the foamy yeast mixture and 1/4 cup (60ml) of olive oil. Mix on low until combined, then increase to medium and beat for 3-4 minutes until a sticky, batter-like dough forms.
- Transfer the dough to a lightly oiled bowl, cover, and let it rise in a warm place for 1 hour, or until it has nearly doubled in size.
- Generously oil a 9x13 inch baking pan. Scrape the dough into the pan and use oiled fingers to spread it evenly. Cover and let it rise for another 30-40 minutes until puffy.
- Preheat oven to 425°F (220°C). Drizzle the risen dough generously with olive oil. Dimple the dough all over with oiled fingertips. Sprinkle with fresh rosemary leaves and flaky sea salt.
- Bake for 20-25 minutes until the crust is deep golden brown. Let it cool in the pan for at least 10 minutes before slicing and serving.
Notes
Trust the Stickiness: Gluten-free dough is very sticky, like a thick batter. Do not add more flour; this is the correct consistency for a moist, airy result.
Let It Cool Slightly: Let the focaccia cool in the pan for at least 10 minutes before slicing. This allows the crumb to set properly.

Join the Baking Community!
We are so excited for you to experience this incredible gluten-free focaccia. It’s a testament to the fact that you never have to sacrifice texture or flavor when baking without gluten. After you’ve tried it, please leave a comment below with your thoughts and any creative twists you added! Don’t forget to share your beautiful creations on Pinterest—we can’t wait to see them!