If you have been searching for the holy grail of cake finishes, Russian Buttercream Frosting is the answer to your prayers. This isn’t your standard, grainy American buttercream that leaves your teeth aching from sugar. Instead, this Russian Buttercream Frosting is a sophisticated, velvety, and high-gloss masterpiece that relies on the magic of emulsification between high-quality butter and sweetened condensed milk.
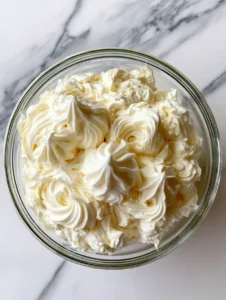
When you look at the pale ivory frosting swirls in a white ceramic bowl, you can immediately see the difference in texture. It is smooth, stable, and has a professional sheen that makes any homemade cake look like it came from a high-end patisserie. Whether you are a beginner or a seasoned baker, mastering this technique will change your dessert game forever.
The beauty of this recipe lies in its simplicity and its incredible structural integrity. Unlike meringue-based frostings that require boiling sugar syrups or tempering egg whites, this Russian Buttercream Frosting comes together in one bowl. It’s the perfect companion for a decadent cherry amaretto tiramisu or as a stable filling for tiered cakes.

Why You’ll Fall in Love with This Velvety Russian Frosting
- Unmatched Glossy Finish: The high fat content from the butter combined with the sugars in the condensed milk creates a smooth ivory frosting with a natural, mirror-like sheen.
- Perfect for Piping: It holds soft peaks and intricate details beautifully, making it ideal for floral piping or clean, modern swirls.
- Not Overly Sweet: Because it lacks powdered sugar, the flavor is milky, rich, and balanced—much like a high-end vanilla bean ice cream.
- Two-Ingredient Base: It is incredibly cost-effective and uses pantry staples you likely already have on hand.
The Short List of Essential Ingredients
To achieve that signature glossy, pale ivory Russian buttercream frosting, the quality and temperature of your ingredients are non-negotiable. Here is what you need to gather:
Unsalted Butter: You need 1 cup (227g) of high-quality, European-style unsalted butter. European butter has a higher fat content and lower water content, which is critical for achieving a velvety, stable texture. Ensure it is softened to exactly 65-68°F (18-20°C).
Sweetened Condensed Milk: You will use 1 can (14 oz / 397g) of full-fat sweetened condensed milk. This acts as both the sweetener and the liquid base. For the best emulsion, the milk should be at room temperature, matching the butter.
Pure Vanilla Extract & Salt: While the base is 2 ingredients, a teaspoon (5ml) of vanilla and a pinch of fine sea salt are the “invisible” ingredients that elevate the flavor from “good” to “extraordinary.”
The Science of the Perfect Emulsion
Making Russian Buttercream Frosting is less about cooking and more about chemistry. You are essentially creating a permanent emulsion between the water in the condensed milk and the fat in the butter. If you’ve ever made a cowboy butter recipe for a savory steak, you know how important it is to keep your fats stable.
In this sweet version, we are aerating the butter until it transforms from yellow to a pale ivory. This aeration creates millions of tiny air pockets that will eventually hold the condensed milk in place. If your ingredients are too cold, they won’t bond. If they are too warm, the butter will melt, and you’ll end up with a soupy mess instead of thick, glossy frosting.

How to Make Glossy Russian Buttercream Frosting
Step 1: Aerating the Butter to Pale Ivory
Place your 1 cup (227g) of softened unsalted butter into a white ceramic bowl or the bowl of a stand mixer. Using the paddle attachment or a hand mixer, beat the butter on medium-high speed for at least 5 to 8 minutes.
Visual Cue: You are looking for the butter to double in volume and turn from a deep yellow to a smooth ivory. It should look like thick whipped cream before you add a single drop of milk.
Step 2: The Slow Incorporation Process
Turn your mixer down to medium-low. Begin adding the 1 can (397g) of sweetened condensed milk one tablespoon at a time. This is the most critical part of the Russian Buttercream Frosting process. Do not rush this step.
Sensory Cue: As you pour, you will hear the mixer’s sound change as the frosting becomes heavier and more velvety. If the mixture starts to look curdled, stop adding milk and beat on high until it smoothes out again.
Step 3: Finishing the Swirls
Once all the milk is incorporated, add your vanilla and salt. Scrape down the sides of the bowl. Increase the speed to high for one final minute to ensure it is thick and glossy. Use a silver metal offset spatula to stir the frosting by hand for 30 seconds to remove any large air bubbles.
Visual Cue: Lift the spatula out of the bowl to showcase a smooth, swirled dollop. The frosting should hold its shape perfectly with soft peaks that don’t slump.
Pro Tips for Decorating Success
- Check Your Temperatures: If your kitchen is hot, your frosting will be soft. Pop the bowl in the fridge for 10 minutes, then re-whip to restore the stable texture.
- Avoid the “Split”: If the frosting looks like cottage cheese, the condensed milk was likely too cold. Warm the bowl slightly with a hair dryer for 10 seconds while mixing to bring it back together.
- Coloring Your Frosting: Use gel food coloring rather than liquid. Liquid colors can break the emulsion of this glossy Russian buttercream.
- Flavor Variations: You can add cocoa powder, espresso powder, or even fruit reductions to this base. It is incredibly versatile!
How to Store and Revive Your Frosting
Storage: This frosting can be kept in an airtight container at room temperature for up to 6 hours if the room is cool. For longer storage, refrigerate for up to 1 week.
Freezing: Russian Buttercream Frosting freezes beautifully. Place it in a freezer-safe bag for up to 3 months. Thaw overnight in the refrigerator.
Reviving: Never use this frosting straight from the fridge. It will be as hard as a stick of butter! Let it come to room temperature completely, then re-whip it until it regains its velvety, stable texture and smooth ivory glow.
What to Pair with Russian Buttercream
This frosting is the perfect finishing touch for a variety of desserts. While we love a classic vanilla cake, try it on a warm peach cobbler for a creamy topping or as a filling between layers of a 4th of July dessert lasagna.
For a refreshing summer meal, follow a light strawberry pecan chicken salad with a cupcake topped with these ivory frosting swirls. The richness of the buttercream provides a perfect contrast to a bright, fruity meal.
Frequently Asked Questions
Absolutely! Russian buttercream is famous for its stability. Once whipped to a thick, glossy consistency, it holds intricate details and soft peaks perfectly, making it ideal for floral work.
Yes, because it contains a high amount of dairy (condensed milk), it should be refrigerated if not consumed within 6 hours. However, always bring it back to room temperature before serving for the best texture.
Because of the butter, this frosting is naturally pale ivory. To get it whiter, whip the butter for a full 8 minutes before adding milk, or add a tiny drop of purple gel food coloring to neutralize the yellow tones.
No, it is actually less sweet. Since it uses sweetened condensed milk instead of pounds of powdered sugar, it has a milky, rich flavor profile rather than a sugary one.
Curdling usually happens when there is a temperature difference between the butter and the condensed milk. Ensure both are between 65-68°F. If it separates, warm the bowl slightly with a hair dryer and re-whip.
The Ultimate Russian Buttercream Frosting Recipe


Russian Buttercream Frosting: The 2-Ingredient Glossy Miracle
Ingredients
Equipment
Method
- Place softened unsalted butter in a white ceramic bowl. Whip on medium-high speed for 5-8 minutes until it turns a pale ivory color and is very fluffy.
- Slowly add the sweetened condensed milk one tablespoon at a time while mixing on medium speed, ensuring each addition is fully incorporated before adding more.
- Add vanilla and salt. Whip on high for 1 minute until the frosting is thick, glossy, and velvety. Use a silver metal offset spatula to stir out air bubbles.
Notes
If the frosting separates, warm the bowl slightly and re-whip on high speed.
Join the RecipeHarvest Community!
Did you try making this Russian Buttercream Frosting? We want to see those glossy ivory swirls! Please save this recipe to your favorite Pinterest board and follow RecipeHarvest for more professional baking tips. Leave a 5-star rating in the comments below and upload a photo of your finished cake—it helps our community grow and helps other bakers find success!