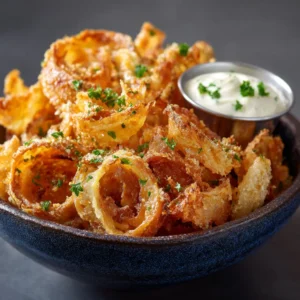
Prepare to experience an appetizer that completely redefines everything you thought you knew about onion rings. These are not your average, thick-cut, doughy rings. We’re talking about shatteringly crisp, golden-brown Parmesan Onion Ring Chips, piled high in a rustic bowl, just waiting to be dipped into a creamy, cool sauce. Every bite delivers an audible crunch, followed by the sweet, mellow flavor of onion and the salty, nutty taste of real Parmesan cheese.
Inspired by the vision of a perfectly executed dish, this recipe is engineered to produce that exact result: ultra-thin, incredibly crispy onion chips that look as amazing as they taste. The bright, clean lighting of our kitchen today is highlighting every single delicious texture, from the lacy parmesan crust to the sprinkle of fresh parsley on top. Get ready to make the most addictive snack that will ever come out of your kitchen.
Why This Recipe Shatters All Expectations
- Unbelievable Texture: Forget soft and greasy. These onion ring chips are designed for maximum crispiness, thanks to a special panko and Parmesan coating that fries up light, airy, and golden brown.
- Rich, Savory Flavor: We use real, freshly grated Parmesan cheese in the breading, which creates a deliciously salty and nutty crust that perfectly complements the sweet onion inside.
- Visually Stunning: Just look at them! Piled high in a deep blue ceramic bowl, garnished with fresh green parsley, and served with a creamy white dipping sauce, this is an appetizer that demands to be the center of attention.
- Perfectly Dippable: The chip-like structure makes them the ideal vessel for scooping up a generous amount of our simple yet flavorful creamy garlic dipping sauce.
The Anatomy of the Perfect Onion Chip
For the Golden Onion Rings
Sweet Onions: The foundation of our recipe. We use 2 large sweet onions, like Vidalia or Walla Walla, because their lower sulfur content provides a sweet, delicate flavor without the harsh bite of regular yellow onions. This is crucial for that signature taste.
All-Purpose Flour: You’ll need about 1 cup (120g) of all-purpose flour. This first dredging step is essential as it gives the egg wash something to cling to, ensuring a perfectly even coating on every chip.
Eggs: Two large eggs, lightly beaten, act as the binder. This is the critical bridge between the initial flour coat and the final crispy Parmesan breading.
Panko Breadcrumbs: For that light, airy, and shatteringly crisp texture, 1 1/2 cups (180g) of Panko breadcrumbs are non-negotiable. They absorb less oil than traditional breadcrumbs, resulting in a crunchier, less greasy finish.
Parmesan Cheese: The star of the show! Use 1 cup (100g) of finely grated Parmesan cheese. For the best results, grate your own from a block; it melts and crisps up far better than the pre-shredded kind.
Seasonings: A simple blend of 1 tsp (6g) salt, 1/2 tsp (1g) black pepper, 1 tsp (3g) garlic powder, and 1/2 tsp (1g) smoked paprika infuses the coating with a subtle warmth and savory depth.
Frying Oil: You’ll need approximately 4 cups (950ml) of a neutral oil with a high smoke point, like canola, vegetable, or peanut oil. This ensures the chips fry to a perfect golden brown without burning.
For the Creamy Dipping Sauce
Mayonnaise: The base of our creamy white dipping sauce is 1 cup (220g) of good quality mayonnaise. It provides the richness and smooth texture.
Garlic: One clove of finely minced garlic gives the sauce a gentle, aromatic bite that cuts through the richness of the fried onion rings.
Lemon Juice: The juice of half a lemon, about 1 tbsp (15ml), adds a necessary brightness and tang, balancing the creamy mayonnaise.
Fresh Parsley: We’ll use 1 tbsp (4g) of finely chopped fresh parsley for a touch of green freshness in the sauce and for the final garnish. Salt and pepper to taste will round it all out.
 1")
Essential Tools for Golden-Brown Perfection
To achieve the results you see in the photos, having the right equipment is key. Nothing fancy is required, but these tools will make the process smooth and successful.
- Large Heavy-Bottomed Pot or Dutch Oven: This is for frying. A heavy bottom ensures even heat distribution and retention, which is critical for maintaining the correct oil temperature.
- Mandoline Slicer (Optional, but Recommended): For ultra-thin, chip-like onion rings, a mandoline is your best friend. It guarantees every slice is perfectly uniform, which means they all cook at the same rate. If you don’t have one, use your sharpest knife and a steady hand.
- Three Shallow Dishes: For setting up your three-stage breading station (flour, egg, Panko-Parmesan mix). Pie plates or shallow bowls work perfectly.
- Tongs or a Spider Strainer: Essential for safely adding and removing the onion rings from the hot oil without breaking their delicate crust.
- Wire Cooling Rack: This is the professional’s secret to long-lasting crispiness. Placing the fried onion rings on a wire rack to drain, instead of on paper towels, allows air to circulate and prevents them from steaming and becoming soggy.
From Humble Onion to Crispy Golden Chip: A Step-by-Step Guide
Follow these steps closely, paying attention to the sensory cues, to recreate the exact dish from the blueprint.
Step 1: Whisk Together the Creamy White Dipping Sauce
Let’s start with the sauce so the flavors have time to meld. In a small bowl, combine the 1 cup (220g) of mayonnaise, 1 minced garlic clove, 1 tbsp (15ml) of lemon juice, and 1 tbsp (4g) of chopped parsley. Whisk until smooth, then season with salt and pepper to your liking. Cover and refrigerate while you prepare the onion rings. You’ll notice the garlic flavor becomes more pronounced as it sits.
Step 2: Prepare the Onions and Breading Station
Peel the sweet onions and slice them into very thin, 1/8-inch (3mm) rings. A mandoline is perfect for this. Carefully separate the rings.
Next, set up your breading station. In the first shallow dish, combine the 1 cup (120g) of flour with a pinch of salt and pepper. In the second dish, lightly beat the 2 eggs. In the third dish, thoroughly mix the 1 1/2 cups (180g) of Panko breadcrumbs, 1 cup (100g) of grated Parmesan, 1 tsp (6g) salt, 1/2 tsp (1g) pepper, 1 tsp (3g) garlic powder, and 1/2 tsp (1g) smoked paprika. Your assembly line is now ready.
Step 3: The Art of the Three-Stage Breading
Working with a few onion rings at a time, first dredge them in the flour mixture, shaking off any excess. Then, dip them completely in the beaten egg, allowing the excess to drip off. Finally, press them firmly into the Panko-Parmesan mixture, ensuring they are fully and generously coated. Place the breaded rings on a baking sheet in a single layer. This meticulous coating is the key to the crispy, golden-brown armor we’re after.
 2")
Step 4: The Perfect Golden Fry
In your heavy-bottomed pot, heat about 2-3 inches of oil to 350-375°F (175-190°C). A thermometer is highly recommended for accuracy. If you don’t have one, a small piece of breading should sizzle vigorously and turn golden in about 30 seconds.
Carefully add the breaded onion rings to the hot oil in a single layer. Do not overcrowd the pan; this will drop the oil temperature and result in greasy rings. Fry for 2-3 minutes, flipping once, until they are a deep, rich golden brown. You’re looking for that perfect color described in our visual blueprint.
Step 5: Draining, Seasoning, and Garnishing
Using tongs or a spider strainer, remove the golden-brown onion ring chips from the oil and transfer them to a wire cooling rack. Immediately sprinkle them with a tiny pinch of salt. This final seasoning adheres best when they are fresh from the fryer.
Once all the rings are fried, pile them high in your favorite rustic dark blue ceramic bowl. Nestle the small metal ramekin of creamy dipping sauce among the chips. For the final touch, garnish the entire dish with a light sprinkle of the remaining finely chopped fresh parsley.
Pro Secrets for Ultra-Crispy Onion Rings
- Maintain Oil Temperature: The single most important factor for crispiness. If the oil is too cool, the rings absorb it and become greasy. If it’s too hot, the coating will burn before the onion cooks. Use a thermometer!
- Don’t Overcrowd the Pan: Frying in small batches ensures the oil temperature stays stable and gives each chip enough space to crisp up properly.
- The Wire Rack is Non-Negotiable: Placing fried foods on paper towels traps steam, making them soggy. A wire rack allows air to circulate underneath, keeping them perfectly crisp.
- Uniform Slices are Key: Whether using a knife or a mandoline, ensure your onion slices are the same thickness. This allows them to cook evenly for consistent results.
- Press the Breading Firmly: When you’re in the final Panko-Parmesan stage, gently but firmly press the coating onto the onion ring to ensure it adheres well during frying.
Keeping the Crisp: Storage & Reheating Advice
These Crispy Parmesan Onion Ring Chips are undeniably best enjoyed fresh from the fryer when their crunch is at its peak. However, if you have leftovers, you can store them in an airtight container at room temperature for up to 2 days.
To bring back some of that glorious crunch, reheat them in an oven or air fryer at 375°F (190°C) for 5-7 minutes, or until hot and re-crisped. Avoid the microwave at all costs, as it will turn them soft and chewy.
Perfect Pairings for Your Parmesan Onion Chips
While these onion ring chips are a showstopper on their own, they also play beautifully with others. Imagine serving them as the ultimate crunchy sidekick to a comforting bowl of Hearty Cheeseburger Soup (coming soon), where you can dip them right into the rich, cheesy broth.
They also make a fantastic addition to an appetizer spread alongside savory French Dip Tortilla Roll-Ups. For a meal with a bit of a kick, try them as a cooling, crunchy counterpoint to a flavorful bowl of Spicy White Chicken Chili (coming soon). They are also a wonderful alternative to fries when serving a juicy Greek Chicken Burger.
Your Crispy Questions, Answered
Yes, you can! For an air fryer version, preheat it to 375°F (190°C). Arrange the breaded onion rings in a single layer in the basket, being sure not to overcrowd it. Spray them lightly with cooking oil and air fry for 8-10 minutes, flipping halfway through, until golden brown and crispy.
These onion rings are best served immediately for maximum crispiness. However, you can bread the onion rings a few hours in advance and keep them in a single layer on a baking sheet in the refrigerator until you’re ready to fry.
Absolutely. While Parmesan provides a classic nutty flavor, you could substitute it with other hard, salty cheeses like Pecorino Romano or a well-aged Asiago. The key is to use a dry, hard cheese that will grate finely and crisp up nicely.
The key to preventing sogginess is to maintain your oil temperature (350-375°F / 175-190°C) and to drain the cooked onion rings on a wire rack, not on paper towels. The wire rack allows air to circulate, preventing steam from softening the crispy coating.
Sweet onions, such as Vidalia, Walla Walla, or Texas Sweet, are the best choice. They have a higher sugar content and lower sulfur content, which gives them a milder, sweeter flavor that is perfect for onion rings.
The Official Crispy Parmesan Onion Ring Chips Recipe
Crispy Parmesan Onion Ring Chips (The Ultimate Appetizer)
Ingredients
Equipment
Method
- In a small bowl, whisk together mayonnaise, minced garlic, lemon juice, and 1 tbsp of the chopped parsley. Season with salt and pepper to taste. Cover and refrigerate until ready to serve.
- Peel and slice onions into 1/8-inch thick rings. In a shallow dish, place the flour. In a second dish, lightly beat the eggs. In a third dish, combine Panko breadcrumbs, grated Parmesan, salt, pepper, garlic powder, and smoked paprika.
- Working in batches, dredge each onion ring in flour, then dip in the egg, and finally press firmly into the Panko-Parmesan mixture to coat completely. Place on a baking sheet.
- In a large, heavy-bottomed pot, heat oil to 350-375°F (175-190°C).
- Carefully fry the onion rings in small batches for 2-3 minutes, flipping once, until deep golden brown and crispy. Do not overcrowd the pan.
- Remove the onion rings with a slotted spoon or tongs and drain on a wire rack. Immediately sprinkle with a little salt. Once all rings are fried, pile them in a serving bowl, garnish with the remaining fresh parsley, and serve immediately with the chilled dipping sauce.
Notes
Don't Overcrowd the Pan: Fry in small batches to ensure the oil temperature doesn't drop, which can lead to greasy results.
Use a Wire Rack: Let the onion rings drain on a wire rack, not paper towels, to keep them from steaming and getting soggy.
Freshly Grated Parmesan: Grating your own cheese from a block provides the best flavor and texture for the crispy coating.
Join the Crispy Conversation!
Now that you have the blueprint for the most incredible Crispy Parmesan Onion Ring Chips, it’s your turn to make them! We promise, once you hear that crunch, you’ll be completely hooked. Don’t forget to serve them in a beautiful bowl with that creamy dip, just like the picture.
Did you make this recipe? We’d love to see it! Leave a comment below with your thoughts or tag us on Pinterest with your creations. Happy cooking!
 4")