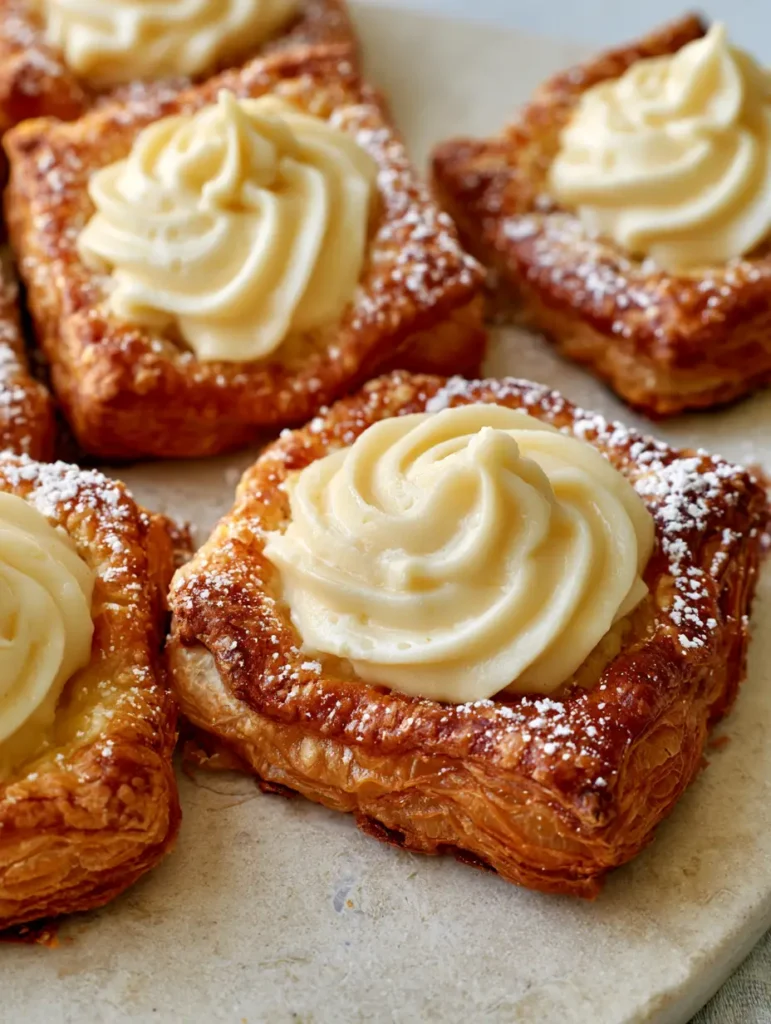
There is nothing quite like a warm Mini Cheese Danish fresh from the oven to start your morning on a high note. This Mini Cheese Danish captures everything you love about an expensive French patisserie—think crisp, flaky layers of golden-brown pastry and a center of rich, matte ivory cream cheese—all made easily in your own kitchen. If you have been searching for the perfect Mini Cheese Danish that actually tastes like it came from a professional bakery, you have found it. The contrast between the shattered puff pastry and the thick, sweetened filling is a sensory experience that validates every Pinterest scroll.
Why You Will Crave These Flaky Pastry Bites
- Sensory Textures: Deeply golden-brown puff pastry with visible, high-definition flaky layers that crunch with every bite.
- Perfect Filling: A thick dollop of smooth, matte ivory-colored sweetened cream cheese that is perfectly set and never runny.
- Visual Appeal: Finished with a fine, light dusting of white powdered sugar, making them look exactly like the ones in the professional bakery window.
- Quick Prep: Using high-quality puff pastry allows you to skip the hours of laminating dough while still getting those crisp, flaky layers.
If you love working with pastry dough, you might also enjoy my savory puff pastry bites for your next brunch gathering. They use a similar technique but with a savory twist!
The Essential Ingredients for Success
To achieve that specific Mini Cheese Danish look from our visual blueprint, each ingredient serves a scientific and aesthetic purpose. Do not skip the quality here!
The Pastry Foundation
1 sheet (approx. 245g) Puff Pastry: This provides the structural integrity and those iconic shattered, flaky layers. Ensure it is kept cold until the moment you are ready to cut it.
The Creamy Center
8 oz (225g) Full-Fat Cream Cheese: Use the block variety, not the spreadable kind in a tub. This ensures the filling remains a thick, matte dollop rather than melting into the pastry. It should be softened to room temperature for a smooth, pale ivory finish.
1/4 cup (50g) Granulated Sugar: This sweetens the cheese without making it grainy or overly thin.
1 tsp (5ml) Vanilla Extract: Use a high-quality extract or vanilla bean paste to provide those tiny black flecks and a floral aroma.
1 Egg Yolk: Adding just the yolk to the filling provides a slightly set and thick texture that holds its shape during the bake.
The Finishing Touches
1 Egg + 1 tbsp (15ml) Water: This creates the “egg wash” responsible for the deep golden-brown shine on the pastry edges.
2 tbsp (15g) Powdered Sugar: Used for that final very fine, light dusting that completes the look.
Looking for more creamy centers? Try my mini cheesecakes for a dessert that requires zero oven time.
Step-by-Step: How to Make the Perfect Mini Cheese Danish
Step 1: Tempering the Pastry and Cream Cheese
Start by taking your puff pastry out of the freezer. It needs to be pliable but still very cold to the touch. If the butter inside the pastry melts before it hits the oven, you will lose those highly visible, crisp, flaky layers.
Meanwhile, ensure your cream cheese is at room temperature. Cold cream cheese will result in a lumpy filling, whereas we are aiming for a smooth, matte, pale ivory-colored center.
Step 2: Whipping the Sweetened Filling
In a medium bowl, combine the softened cream cheese, granulated sugar, vanilla extract, and egg yolk. Use a hand mixer or a stiff spatula to cream them together until completely homogenous. You want a generous, thick dollop consistency that won’t run when piped or spooned onto the dough.
Step 3: Precision Cutting and Scoring
Unroll your pastry sheet on a light-colored stone background or parchment paper. Cut the sheet into 9 equal squares. Using a sharp paring knife, lightly score a smaller square inside each piece, about 1/2 inch (1.25cm) from the edge. Do not cut all the way through! This scoring allows the edges to rise high while the center stays weighted down by the cheese.

Step 4: Filling and the Golden Egg Wash
Place a generous, thick dollop (about 1.5 tablespoons) of the cream cheese mixture into the center of each scored square. Use a pastry brush to apply the egg wash (egg beaten with water) only to the exposed edges of the pastry. This is the secret to achieving that deep golden-brown finish in the oven.
Step 5: The High-Heat Bake
Preheat your oven to 400°F (200°C). Slide the danishes in and bake for 15-18 minutes. Watch for the visual cues: the pastry should be puffed significantly, showing crisp, flaky layers, and the edges should be a deep golden-brown. The cream cheese center should look slightly set and thick, with a matte finish.
Step 6: The Final Sugar Dusting
Let the danishes cool for at least 10 minutes on a wire rack. This is crucial; if you dust them while they are steaming hot, the white powdered sugar will melt and disappear. Once cooled, use a fine-mesh sieve to scatter a very fine, light dusting across the top edges of the pastry.
If you enjoy these for breakfast, you’ll love my breakfast recipes (coming soon) for a full weekend spread!
Expert Tips for Bakery-Quality Results
- Keep it Cold: If the pastry gets too soft while you are working, pop it back in the fridge for 10 minutes. Cold butter equals flaky layers.
- Don’t Over-mix: When making the sweetened cream cheese filling, mix just until smooth. Over-mixing can incorporate too much air, causing the center to puff and then collapse.
- Use a Silpat or Parchment: This prevents the bottoms from browning too quickly and ensures an even golden-brown bake.
- The Center Scoring: Ensure your scoring is deep enough to see the mark but shallow enough to not pierce the bottom. This creates the “nest” for the thick dollop of cheese.
Storage, Reheating & Freezing
Storage: These Mini Cheese Danishes are best enjoyed the day they are made. However, you can store leftovers in an airtight container in the refrigerator for up to 3 days. Note that the powdered sugar may dissolve in the fridge due to moisture.
Reheating: To restore the crisp, flaky layers, place them in a 350°F (175°C) oven or air fryer for 3-5 minutes. Avoid the microwave, as it will make the pastry rubbery.
Freezing: You can freeze these unbaked! Prepare them up to the egg wash step, freeze on a tray, then transfer to a bag. Bake from frozen, adding an extra 3-5 minutes to the bake time.
What to Serve With Mini Cheese Danishes
These danishes are a star on their own, but they pair beautifully with a full brunch menu. Serve them alongside a savory dessert pastry platter or a fresh fruit salad. For a high-protein balance, a side of scrambled eggs or crispy bacon is the perfect foil to the sweetened cream cheese filling.
Frequently Asked Questions
You can assemble them and keep them in the fridge for up to 4 hours before baking, or freeze them unbaked for up to a month. They are always best served fresh and crisp.
It is not recommended. Low-fat cream cheese has a higher water content, which can make the filling runny and cause the puff pastry to become soggy during baking.
While this recipe focuses on a classic sweet cream cheese center, you can certainly add a teaspoon of jam or a fresh raspberry on top of the cheese dollop before baking.
The secret is the egg wash. Using a whole egg beaten with a splash of water provides the proteins and fats necessary for the Maillard reaction, resulting in that professional golden shine.
The most common reason is that the pastry became too warm before baking. The butter inside must be cold to create steam and lift the layers. Try chilling the prepared danishes for 10 minutes before sliding them into the oven.
The Ultimate Mini Cheese Danish Recipe


Mini Cheese Danish: Easy Bakery-Style Puff Pastry Recipe
Ingredients
Equipment
Method
- Preheat your oven to 400°F (200°C) and line a baking sheet with parchment paper.
- In a bowl, beat the softened cream cheese, granulated sugar, vanilla, and egg yolk until smooth and matte ivory in color.
- Unroll the puff pastry and cut into 9 squares. Score a smaller square 1/2 inch from the edge of each piece.
- Place a generous, thick dollop of the cream cheese filling in the center of each square.
- Brush the edges of the pastry with the egg and water mixture to ensure a deep golden-brown finish.
- Bake for 15-18 minutes until the layers are visibly flaky and the pastry is golden.
- Cool on a wire rack for 10 minutes, then apply a fine dusting of powdered sugar.
Notes
Always use block cream cheese for a thicker filling texture.
Save This Recipe to Pinterest!
Don’t lose this recipe! Click the “Save” button on the image above to pin this to your Breakfast or Dessert boards on Pinterest. We love seeing your creations—please follow RecipeHarvest for more bakery-style treats and share a photo of your Mini Cheese Danish in the comments below. If you loved these flaky layers and matte ivory filling, please leave us a 5-star rating!